Hello Everyone!!
In this tutorial we will see how to create a simple Spring Boot Docker Image
What is Docker?
A collection of platform as a service (PAAS) products that use virtualization of OS-level to provide software in packages named containers. Containers are isolated/separated from one to another and bundle their own/related libraries, configuration files, and software; containers can talk with each other through channels. For more details visit https://www.docker.com/
So let’s move on developing
Prerequisites
1. Java 11 Installed
2. Docker Installed
3. Docker Hub Account
4. IDE (Ex. IntelliJ IDEA)
Setting Up the Project
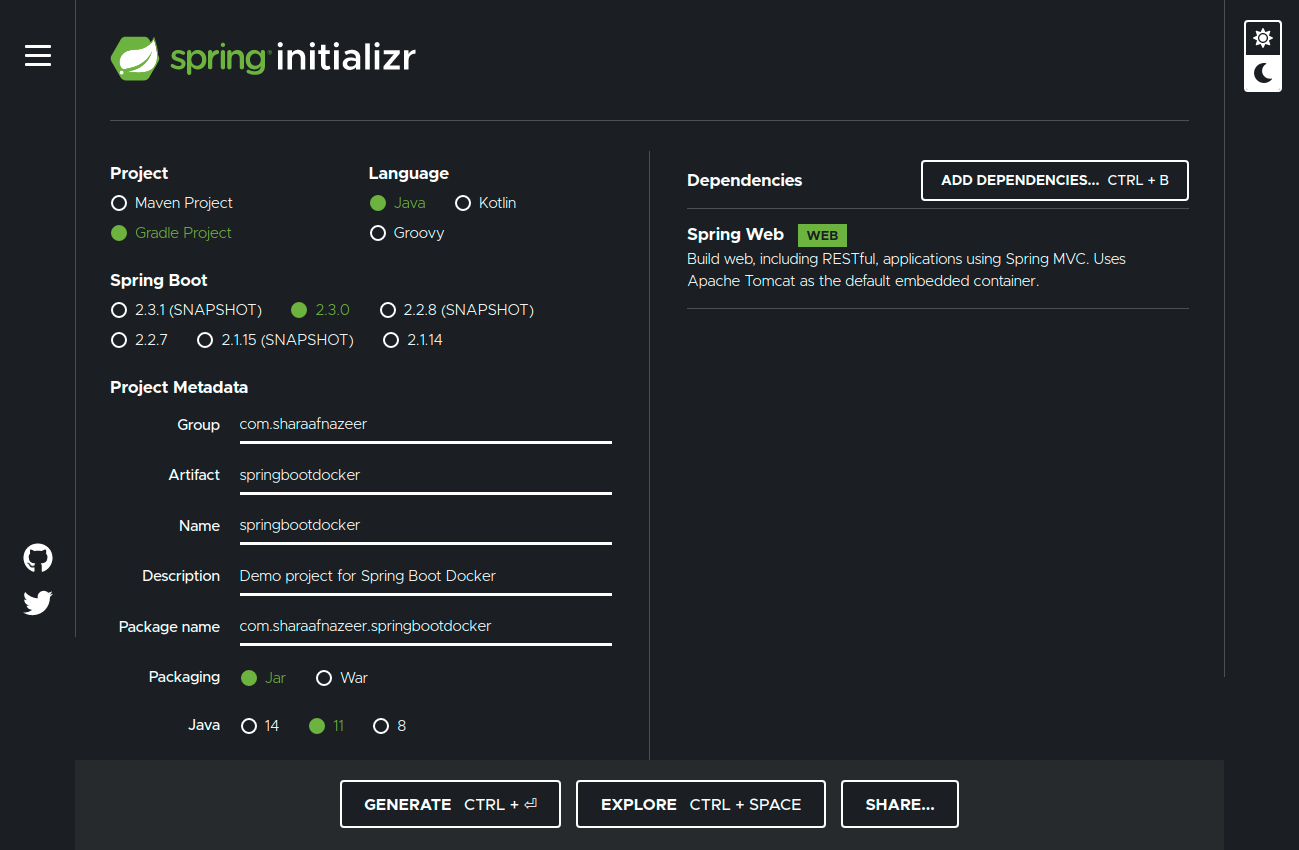
As shown bellow, setup your project with Spring Initializr

Create a Simple REST Controller
To expose our REST API, we will create a simple controller and name it as MainController. You can use your own naming conversions.
Build the Application
We need to build our application in order to create a Docker image. But spring boot usually creates our .jar file with some default naming pattern. That means it combines our project name with our project version and creates a new name.
In our case
– Project Name: springbootdocker (Can find in settings.gradle file)
– Version : 0.0.1-SNAPSHOT (Can find in build.gradle file)
So therefore our final .jar file name will be springbootdocker-0.0.1-SNAPSHOT.jar. This name looks like unfamiliar to us. Therefore we will override the naming pattern with some other keywords.
So, in our build.gradle file we will add the following code snippet to tell spring boot to use the custom name while it builds our application.
bootJar{
archiveFileName = ‘spring-boot-docker.jar’
}
So our final build.gradle file will look like something bellow
After all these configurations, now finally we will try to build our application.
Move to the gradle tab from right side of IntelliJ IDEA and find out build option and select it to run a build (Located under projectName -> Tasks -> Build -> build).

When our application got built successfully we can find our .jar file under build -> libs folder

Create a Docker Account
In order to create a docker account, we need to create an account through https://hub.docker.com/
Docker hub provides unlimited public repository creations and one private repository creation.
My docker account name is : sharaafnazeer
Create a Docker File
Now we will create a Dockerfile under the root folder of our application and we will add some code to point out where our .jar file is located. So Docker can easily find our .jar file and build a Docker image of it.
So that’s it. Now we are ready to build our docker image
Build a Spring Boot Docker Image
In order to build a docker image of our application, we need to open our terminal from the root directory of our project and enter the following command.
docker build . -t sharaafnazeer/spring-boot-docker
we need to use sudo privileges if there’s a permission issue
Here we need to provide our username to create a tag. Then only docker will find out where to publish this image. In my case it is sharaafnazeer

Once our image got build successfully we need to cross check our docker images whether newly created image exists or not
so provide command docker images

Yes our new image exists
Create a new Docker Container
Even though we have our docker image, we cannot run our application using that. In case of that we need to create a docker container of that image.
Therefore run command docker run -d -p 8081:8080 image_id_of_our_image
Here we are exposing the port number 8081 of our container and mapping it to port number 8080 (where our spring boot application usually run). Then only we can run the application from out side of the container.
Now we need to check whether our container is up and running.
Enter command docker container ls

Yes our container is up and now it is mapped to port 8081. That means we can access our application through localhost:8081

BOOOM!!! that’s it. Now we have created our shitty docker image successfully!!
Publish our Docker Image to Docker Hub
Once we are successful with building our image we need to publish it to docker repositories. So other developers can access and use it 😛 😛 😉
To do that we need to login to our docker account.
So we need to provide command docker login and login to our account.

After login got successful we need to enter command docker push docker_image_name_with_tag to push our image to the repository
In our case it is docker push sharaafnazeer/spring-boot-docker
That’s it. Now we need to check our Docker repositories to confirm whether our image exists.

HOOOOORAYYY!!!. Now our docker image is LIVE!!. 😀 😀
Complete project can be found here
Thanks for Reading!!